Acrylic pouring techniques allow you to use high-fluidity paint in various ways on any canvas or other support material. The fascinating fluid painting technique is highly seductive, and the many methods might result in drastically varied outcomes. The following lesson will show and describe several acrylic pouring strategies and their usage in detail.
What Is Acrylic Pouring, and How Does It Work?
Let’s look at the fluid painting approach known as acrylic pouring. We first combine our various acrylic hues with a pouring medium before applying paint to the canvas surface. You apply paint by pouring it straight onto the canvas without using a brush. The flow of the color may be altered by moving the point from which you are dispensing it.
Fluid painting may be done by anyone, regardless of skill or experience, thanks to the magic of the liquid medium. All you need is some free time and suitable materials to get lost in this joyful, creative process. There are various paint pouring methods for pouring your fluid art painting, and we go through all of them in-depth in the article below.
Are you just getting started with acrylic pours? Please look at our guide to acrylic pouring before you continue reading. You’ll also need different supplies for each of the pouring methods described in this fluid art painting tutorial, which can be found in the article above.
Acrylic Pouring Techniques
Acrylic painting ideas can be customized by using different colors and combinations of acrylic pours. The individual techniques involved in acrylic pouring have their own specificities that must be learned before you can create unique works of art.
It is important to understand the finer aspects of each step involved in the techniques you’re attempting, rather than just blindly following instructions. This approach will not only minimize mistakes but also help you learn from them and refine your bright designs. The list of methods below serves as a starting point for anyone looking to explore the world of acrylic pouring, whether you have prior experience or not.
Puddle Pour
Puddle pouring is another form of painting that involves layering paint in order. Each distinct color must be poured on the canvas one at a time. To allow subsequent colors to compliment the last, choose the foundation color carefully.
- Combine the paints separately, combining each with a pouring medium (such as Liquitex) and water using an approximate ratio of one part color, one part medium, and less than one part water (1:1:<1), which may be adjusted to the desired consistency. Add two or three drops of silicone oil to each color for improved cell formation.
- The painter begins with one color in a step-by-step approach and then works his way down the palette until they reach white.
- The picture is then tilted back and forth repeatedly to allow the paint to flow smoothly over its surface. The application of this method determines the end result’s individuality.
Dirty Pour
A dirty pour painting technique entails combining all colors into the same container before pouring them onto the canvas.
- Add the colors to a mixing container in equal quantities and combine them with water, utilizing an approximate proportion of 1:1:<1. For better cell development, add a few drops of silicone oil to each color.
- Each color is individually combined then added to the same vessel.
- To allow the colors to blend, stir this last combination ever so slightly.
- Allow the canvas to dry for 24 hours.
- Then, repeatedly turn the canvas until the paint has an equal chance to run across the surface. The way you tilt the canvas will influence the appearance of your completed piece.
Flip Cup
A flip cup is one type of dirty pour painting. This method, known as messy pour painting, has a similar approach to clean pour painting. On the other hand, the paint mixture must be put on the canvas and then lifted away from it to allow the colors’ layers to be more tightly interwoven.
- Combine each color in a separate container, then mix them together with water and a pouring medium in a 1:1:<1 ratio. To enhance the cell formation, add two to three drops of silicone oil to each color combination.
- Each color is combined in a separate vessel before being poured into the same container.
- The container should be placed upright on the canvas surface.
- Raise the container from the surface of the painting.
- If you need more cells, use a heat gun, Bunsen burner, or a hot-air dryer to hover above the canvas for a few seconds.
- If you’re still having trouble after reading through the above steps, make sure to check out this tutorial for some helpful hints. You must then shift and tilt the canvas many times over for the paint to flow uniformly over it. The final result will be determined by your tilting techniques.
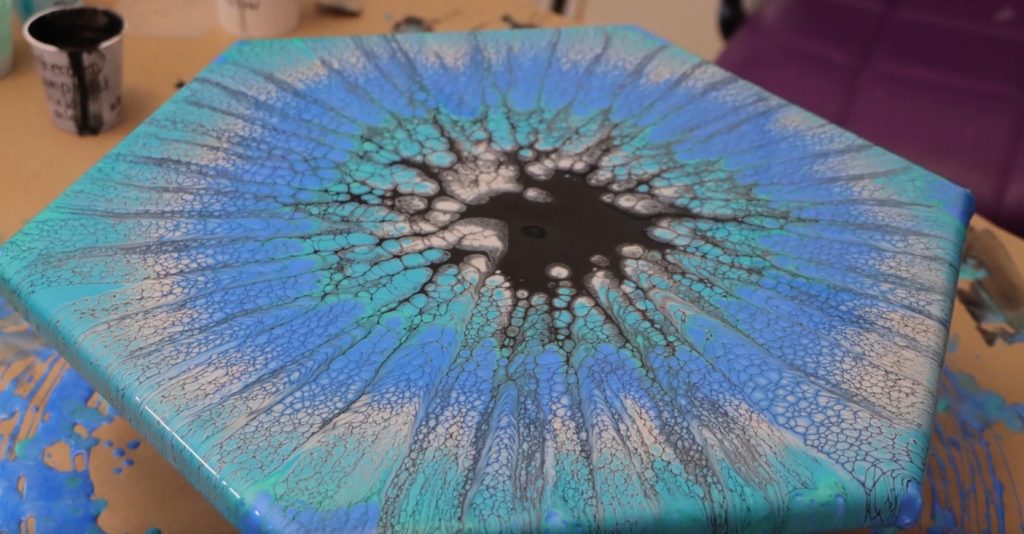
Bottle Bottom Puddle Pour / Flower Pour
To create a flower-shaped pattern on the canvas from the base of a PET bottle, you must use an acrylic pour technique that requires you to apply color to the canvas from the bottom of a bottle. The raised region of the bottle’s base may form a design that resembles a flower. You may also change the final pattern by tiling the canvas after it is finished.
- Combine the three colors of acrylic paint, the medium, and water in separate containers. Because no silicone is required for this technique, cells are not employed.
- To prevent the flower design from consuming the entire canvas, add a base color layer. This will also aid in the paint’s complete absorption onto the surface.
- To ensure that the canvas is level, use a spirit level to keep the pattern you’re applying from spreading.
- To cut the bottom from a PET bottle, utilize a pair of scissors or a utility knife.
- Invert the bottom of the plastic bottle over a canvas and then, one at a time, pour each color in slowly to make a rainbow effect.
- When the paint is sprayed over the bottle’s grooves, it will spread out and produce a floral pattern on the canvas.
- Remove the PET bottle from the canvas with care after determining that the resultant design is acceptable.
- Now that you’ve removed the bottle, you may concentrate on filling in the hole where it previously stood.
- Paint a few highlights of color in the space using a fine-haired brush, working towards the canvas’s edges or toward the center.
- Tilt the canvas to alter and distort the picture to your liking.
- In this case, only one bottom bottle pour is required.
Tree Ring Pour / Swirl Pour
Swirl pouring is a technique of fluid painting that generates a pattern that resembles tree stump growth rings. This happens when the paint is applied with attention in a circular motion.
- In a 1:1:<1 ratio, mix each hue with a pouring medium and water.
- Pour each color into the same container in turn.
- Pour the paint from the container very gradually and evenly on the canvas in a sweeping, concentric, and circulated motion to give the impression of tree growth rings.
- The canvas must then be tilted back and forth several times to ensure that the “growth rings” cover its entire surface.
Wing Pour
This approach, known as the wing pour, is a variation of the swirl pour that creates a pair of wings instead of tree rings. This discovered method is suggested for an intermediate-level user with prior experience using acrylic pours.
- In a mixing ratio of 1:1:<1, combine each color with a pouring medium and water.
- The most central area of the pouring container will be colored first.
- The second color in the combination will be seen outside of the first, within the wings. Re-add your original color choice to the second layer to produce a distinct visual impact.
- Pour a different color into the mix, just along the container’s edges, as this is an integral part of the process.
- Add another hue to the mix, which will outline the wing form.
- If you want to use a different color, add another dash of the primary hue to the mixture.
- Pour the paint mixture into the center of the canvas in a smooth, even flow starting from the closest edge. The angle at which you lift the canvas drives paint away, shaping the wings’ form. This method will require practice to become more instinctive.
- To visually separate the pair of wings, move the container towards you as you pour to the canvas’s edge.
You should now have a completed wing pour design. Because this is one of the more difficult acrylic pours, it might take some practice to master the technique.
Swipe Technique
The fluid painting approach, also known as the swipe or wiping technique, represents a versatile and dynamic method of creating stunning and vivid color designs. This approach can be employed as a standalone technique or incorporated with other paint pouring methods to amplify their impact. The key to mastering this technique lies in the proper utilization of tools and the judicious application of color.
The wiping of colors requires the use of specialized tools, such as a spatula, painting knives, or even a damp paper towel. To ensure optimal results, it is imperative to employ silicone drops with the paint and to pour it onto the canvas using either a puddle pour or flip cup method.
The next step is to apply the silicone-free paint mix to the canvas, thereby creating the perfect conditions for cell formation.
The final stage of the swipe technique is to produce cells by dragging the colors from one tool to another, blending and mixing them as you go.
Air Swipe / Dutch Pour
The air swipe technique of pouring differs from the swipe method in that only a hairdryer is used during the process. This creates fascinating, ghostly color patterns that resemble smoke.
- After the paint is tinted, it is poured into a separate container. The canvas is laid centrally face down in the container and flipped while holding the cup to the paint’s surface.
- Allow the container to stand for a few minutes to allow the colors to settle.
- Then, apply the contrasting color around the flip cup and the canvas’s edges. If required, utilize a painting knife to ensure that this is smooth and uniform in distribution.
- Remove the cover of the wooden frame, take out the glass panel beneath it (carefully), and hang a piece of canvas over it. Repeat until you’ve completed many copies. To ensure that the pattern is well-distributed across the canvas, carefully lift and lower the flip cup several times.
- Tilt the canvas to adjust the spread of color if you wish.
- To balance the white, use a cold air hair dryer with a concentrator nozzle and spread the paint outward from the center design to combine it with the contrasting color.
Dutch Pour with Lacings / Shelee Art Bloom Technique
The SheleeArt bloom pouring technique is a unique form of Dutch acrylic flows. This approach is seen as quite hard and elite among paint pouring techniques by many artists. A practiced hand, as well as the appropriate application method, are required for successful execution.
With this pouring method, the air spreads the colors over the canvas and partially substitutes for water. It differs from traditional Dutch painting regarding how paint is applied to the surface and the vast range of cells it creates. The complicated lacings are produced using a very complex recipe and different media types.
String Technique
The string technique, although a staple in the world of fluid art painting, is not always confined to the realm of acrylic pouring. This technique requires a certain finesse and understanding of the materials used to create stunning, one-of-a-kind pieces.
To begin, you’ll need to gather a handful of sisal strings, each around 20 to 30 cm in length, and place them in a container meant for pouring. These strings serve as a blank canvas, waiting to be transformed by the vivid hues of your chosen paints.
Next, it’s time to mix the colors. You have the option of either combining the colors directly in the pouring container, or in separate vessels to be later applied with a spatula. The former method is a simpler process, but it may be more challenging to achieve strong color gradients. The latter, on the other hand, allows for greater control over the final outcome, but requires a more delicate touch.
When mixing the colors, it’s important to keep the ratio of pouring medium to water at 1:1:<1, ensuring that the mixture remains fluid enough to flow easily over the strings. The colors themselves should be combined in equal proportions, without the addition of water.
With the mixture prepared, it’s time to pour. The strings, now soaked in the vivid paint mixture, are stretched out on the canvas, twisting and turning as each strand is dangled into the surface. The result is a mesmerizing interplay of color and texture, each strand contributing to the overall beauty of the piece.
Once the paint has dried, the strings can be removed, revealing the intricate patterns that have formed. This final step is where the magic truly happens, as the technique used to remove the strings produces unique and captivating designs that can be varied to suit your artistic vision.
Chain Pull
This method of tugging the string is identical to that of the string pull, but instead of a rope, it uses a chain. Because the chain’s style or gage influences the outcome, your design will vary depending on what kind of chain you use. Costume jewelry chains, Mardis Gras beads, and pull-and-plug chains are excellent choices for this use.
Balloon Smash
The balloon smash technique is a simple approach that uses only two steps. Apply an initial thin layer to the canvas, followed on by some poured puddles, and then smash a partially inflated balloon into them. This method creates patterns with a floral flavor. Combining this method with other acrylic pour methods such as flip cup and puddle pour to produce various textures and areas of interest in your liquid art painting.
Balloon Dip Pour
The balloon dip pours method is best achieved using a big container with low sides, such as a baking dish, cake or pie pan, a plate, or even a paper plate.
- Using a large brush and/or a roller, apply one layer of paint to the canvas in one color. It’s ideal for beginners learning their first time around using this method.
- Choose between pouring your colors directly into the container above or dirty pour.
- Now, insert an air-inflated balloon into the paint mixture and blot the canvas in various locations.
- Repeat the process until you’ve successfully covered the canvas and the painting is finished.
Strainer or Colander Pour
Acrylic pours with a strainer or colander are the most popular by artists. The procedure utilizes a dirty pour instead of painting directly on the canvas, allowing the paint to filter through a colander or strainer placed on the canvas. The color transforms into a kaleidoscopic effect as it passes through the sieve.
When straining or draining the melon, a colander or strainer with larger holes, or even the catchment ring from a citrus juicer, works best. Because the paint is relatively thick, tiny holes prevent the water from flowing freely and cause colors to mingle, resulting in less impact than you may think.
- Each color should be prepared separately and poured into the same vessel as when utilizing the dirty pour or flip cup technique.
- Allow yourself ample area to create by placing the canvas in the center of your workstation and then setting up the colander in the canvas’s middle. It is feasible to relocate it elsewhere, but keep in mind that this section will become the final design’s central attention point. Moving the colander will have an impact on your overall composition.
- Pour the multicolored liquid into the center of the colander.
- When you’re finished pouring the paint, carefully raise the colander so that the hues fall onto the canvas.
- Once the paint has dried, remove the colander from the surface. To prevent drips from landing on your work, carefully remove them.
- The final photograph should be a kaleidoscope of color within a puddle.
- When painting a large canvas, first tilt the cloth so that the paint covers it entirely. When painting on a round canvas, angle it towards and away from you before slowly spinning it to ensure complete coverage. You may now begin allowing the paint to run off the edges of the canvas after everything is covered. This may be time-consuming, but don’t rush it since doing so might affect your design.
- Keep an eye on the shape and position of your design as you tilt the canvas. It may have altered while you listed, so check to ensure everything is back in its proper place before continuing.
- The center of the painted canvas will be colored with a bubble of color surrounded by swirls, dots, and kaleidoscopic regions formed from the colors. Allow time for your design to dry after you’re pleased with it.
The Dipping Method
The art of adhesion is masterfully achieved through the dipping technique, which offers a simple yet captivating approach to painting with acrylics. This method, though basic in nature, is highly accessible to even the most inexperienced artists, yielding stunning results that are both beautiful and intriguing.
To execute this technique, a solid and pristine surface is imperative. A work table covered with plastic sheets serves as the ideal platform, providing a smooth and hygienic surface for the paint to rest upon.
Using any of the standard acrylic pouring techniques, the artist begins by carefully pouring the paint onto the plastic-covered surface. It is crucial to ensure that the canvas being used has a larger surface area than the plastic sheet, allowing for full coverage and optimal adhesion.
With the canvas now coated in paint, the artist flips it over and begins to apply the brush, securing it firmly in place for a brief period to guarantee a strong bond between the paint and the canvas.
As the painting dries, a final touch of elegance is added through the application of a delicate layer of varnish, sealing the colors and preventing any unwanted mixing. The dipping process continues until the canvas is fully enveloped in rich, vibrant color.
Reverse Dip
As the name suggests, the reverse dip method is a straightforward reversal of the dipping technique. The paint is applied to the canvas in contrast to dipping it. A contact layer is then applied over the canvas to simulate the suction effect attained by dipping.
Injection Pour
The term “injection pour” refers to a method of painting that involves pouring paint gradually over an area using a squeeze bottle. This technique applies paint to the canvas using one of the previously mentioned techniques, then layers a specific color, typically white, beneath it using a squeeze bottle. The image can be tilted and stretched as desired afterward.
Blob Painting
This is a one-of-a-kind method for applying paint since you must keep the paint moving during or after application. Blobs of various colors enable you to build up layers of paint and create a design with actual depth.
Fractal Dendrites
The intricate design of fractal dendrites is an intricate and captivating pattern, reminiscent of delicate flowers in bloom. This advanced technique is achieved through the use of film coated with alcohol droplets, which combine to create a mesmerizing array of colors.
Starting from the center and radiating outwards, the visual effect is accomplished with remarkable ease, yet the result is a breathtaking display of intricate, fractal beauty. The simplicity of the process belies the complexity of the final product, making fractal dendrites a true testament to the power of art and science.
Wreck-a-Ring Pour
The term “wreck-a-ring” comes from the fact that this pouring method deviates from the tree ring pour to provide far greater depth. After completing the tree ring technique but before tilting the canvas, use an implement (your finger or a dowel stick, whatever you have access to) to make fine, evenly distributed lines through the paint. These lines will generate textured patterns in the picture after you’ve tilted it.
Ghost Pour
A ghost pour is a less-common form of swipe pour in which different hues are layered along the center of the canvas over a thinly applied base coat. The picture is then swiped outward from the middle, parallel to the color rows, towards the canvas’s perimeter. Typically, more than one swipe travels across the center, resulting in a mirrored appearance to
- Begin by applying a fluidly mixed color as a base coat to the canvas.
- Begin layering different complementary colors horizontally across the canvas.
- Use a spatula or a damp paper towel to wipe the paint from the center of the canvas inwards and outwards, pulling towards yourself.
- Instead, add some of the thin base coat colors horizontally into the middle of the canvas before swiping over the colors.
- More expansive paintings are better suited to the ghost acrylic pour approach.
- Silicone oil, in particular, is helpful for cell rejuvenation.
Wave Pour
The wave approach of pouring is a purposeful pouring style and a variation on the swipe pour. This visual effect is produced by applying colors in a wave-shaped pattern to the canvas. You may then swipe across the colors from either side of the wave’s peak or the edge of the horizon. Your starting point can be on either side, with the objective being to simulate a swiping motion similar to that of the wave. Keep in mind that white should be used for the foam since it gives depth.
- To begin, combine each color you want to include in your design. We’ve had good results with silver, white, dark blue, sea green, and light blue, but you should experiment with different color combinations.
- After you’ve combined the colors, start pouring streams of each color (except white) to make the desired form of the wave. The state also looks like a Nike logo. Allow the hues to bleed and combine.
- After that, use white to cover the back of the wave shape, painting over the edges.
- Using a brush, paint a thin layer of color all the way up the wave with care to avoid color mixing. If necessary, this procedure may be repeated to ensure that the swipe covers the length of the wave.
- Turn the wave’s motion into white by sliding it into white. The foam or whitewash in the lock is produced by wiping the white toward the wave and then reversing directions.
- The combined color must not be used excessively since this will dull the photo’s brilliant contrast.
Starburst Swipe
A starburst swipe is a pour in which the color layers are built concentrically, starting from the middle out. The effect is created by sweeping tiny regions from the center toward the canvas’s edges.
Conclusion
As you embark on your artistic journey, this guide aims to equip you with the tools necessary to achieve stunning outcomes through acrylic pouring. By combining these various pouring techniques, the possibilities for unique and captivating creations are endless. So don’t shy away from taking risks and experimenting, as each of your works will possess its own inimitable character.