As far as cutting tools are concerned, the drill is the most universally used. However, drills would be nothing without their reamers. An important piece of equipment that, unfortunately, many ignore or are unaware of.
In fact, I have seen many cases of people with drills who do not know what a reamer is. So don’t be part of the ignorance, and take the opportunity to inform yourself about this important piece of equipment.
What is a Reamer?
Reamers, with their cylindrical shape and rotary cutting ability, are a crucial component in the world of machining operations and chip removal processes. These tools, derived from the reaming process, serve to provide a smooth finish to surfaces and to enlarge previously made holes with an elevated degree of accuracy.
But what sets reamers apart from other cutting tools is their teeth or slots, crafted along the body of the tool. These teeth, which can take the form of straight, helical, or conical configurations, serve to direct the cutting process either to the left for through holes or to the right for blind holes.
And the diversity of reamers doesn’t end there. These precision cutting tools come in a range of sizes and shapes, made of high carbon steel, and can be adjustable or non-adjustable, removable or fixed, and designed for manual or machine use.
Activating a reamer may seem as simple as turning it with a wrench, but beware! Not just any wrench will do. A tap wrench, specifically designed for reamers, is required to move the tool. Don’t make the mistake of trying to operate a reamer with an Allen wrench, as this could result in an ineffective cutting process.
Parts of a Reamer
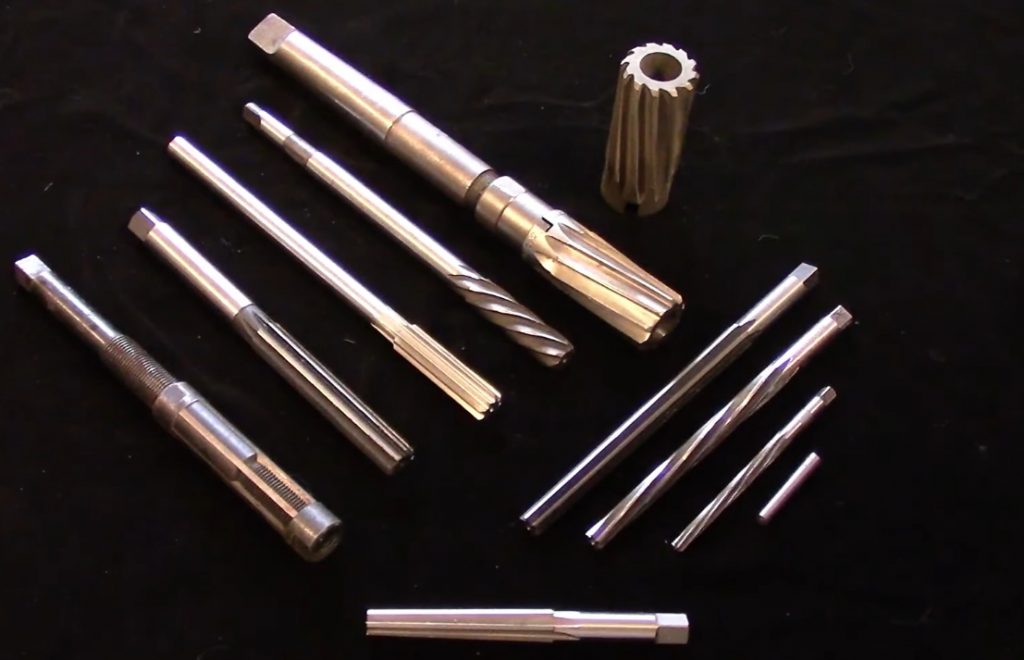
To fully grasp the capabilities of these essential tools, it’s crucial to understand the three defining elements that make up a reamer: splines, neck, and shank.
At the forefront of the reamer lies the flutes, the cutting edge responsible for shaping and smoothing holes with precision. Meanwhile, the shank represents the opposite end, serving as the foundation for stability during operation. Connecting these two integral parts is the neck, a bridge that facilitates seamless transitions between flutes and shank.
The splines, in particular, are worthy of further examination, as they embody several key components that contribute to the reamer’s effectiveness. These components include the face, which eases the reamer’s entry into the drilled hole, the drilling zone, which performs the heavy lifting, impacting the surface with force, the sizing section, which ensures that the reamer yields the desired hole size, and finally, the tapering zone, which reduces friction between the reamer and the surface being drilled.
Types of Reamers
Now that you know what a reamer is, it’s time to learn about the types and functions of each:
1. Manual Reamer
The hand reamer is a classic tool, recognized by its conical tip which provides stability while drilling into the work surface. Its grooves are designed to be irregular, allowing for a more secure grip, even after extended use. To operate a manual reamer, you’ll need a standard or adjustable tap wrench, which features a square shape on the opposite end of the bore. There are two types of manual reamers: the adjustable hand reamer and the straight reamer.
2. Straight Reamer
Straight reamers are designed for a specific purpose – to enlarge small holes to precise measurements. Their straightforward design makes them an excellent choice for those who need to make small adjustments with precision.
3. Machine Reamer
While some reamers can be used by hand, others are made to be used with specialized machines, known as precision reamers. These reamers are similar in design to manual reamers, with a few differences to allow for machine use. For example, their shanks are conical rather than square, and they feature 45° angle faces.
4. Rose Reamer
The rose reamer is designed for softening and finishing holes that are difficult to cut, without losing their size. Its shorter flutes make it an excellent choice for delicate work.
5. Shell Reamer
The shell reamer is a type of reamer with grooves along almost its entire length. It’s ideal for drilling bearings or other similar items.
6. Floating Reamer
The floating reamer is used to correct any misalignment between the cutting shafts of the reamer and a previously made hole. This type of reamer can ensure that your cuts are precise and accurate.
7. Expandable Reamer
Expandable reamers are designed to create holes of different sizes over a limited surface or range. They can remove a small amount of additional material by enlarging the hole. This makes them a versatile choice for those who need to make adjustments to the size of their holes.
8. Carbide Reamer
Carbide reamers are known for their high abrasion resistance, making them an excellent choice for those who need to work with tough materials. They provide a better surface finish and extend the life of the reamer. They are also ideal for creating new holes on their own axis, rather than enlarging previously made holes.
9. Conical Reamer
If you’re looking to make or finish tapered holes, a conical reamer is an excellent choice. This type of reamer is specifically designed for this task, ensuring that your holes are precise and accurate.
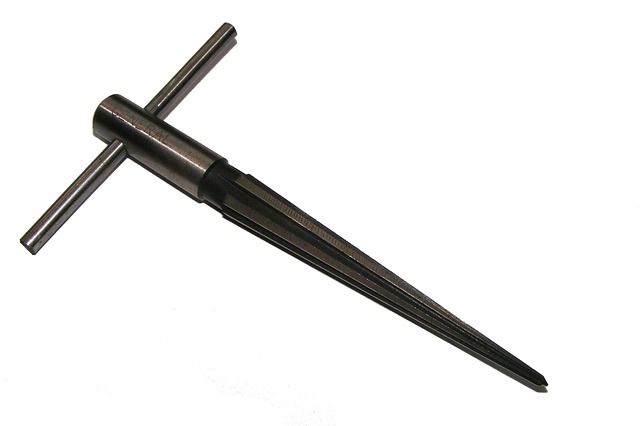
10. Morse Taper Reamer
Morse taper reamers are often used in ship and building construction, where steel plates have shallow and difficult-to-penetrate holes made by drills. A reamer can align these holes, creating enough space for rivets and screws to be placed in the plates. This type of reamer is designed to be highly effective in these specific construction applications.
11. Machine Reamer with Helix Flutes
Machine reamers with helix flutes are designed for smooth, deep cuts with proper shafts in materials such as stainless steel and other surfaces with a strong surface. However, they should not be used on soft surfaces as they can deform the hole and ruin the work.
12. Reamer with Spiral Grooves
The reamer with spiral grooves is unique, as it is only used exclusively for copper and bronze surfaces and holes containing grooves, keyways, or oil channels. This type of reamer is designed to work with these specific materials, ensuring precision and accuracy.
13. Mold Reamer
The mold reamer is designed for the construction of molds and accessories with holes. Its focus on fast drilling makes it an excellent choice for those who need to work quickly and efficiently. With only three flutes and high-angle helixes, this type of reamer is designed for speed and efficiency.
14. Reamer with Point Screws
The reamer with point screws is designed to be used with floating supports. It features right-hand flutes and a hole in the shank, making it an excellent choice for those who need to work in specific conditions.
Speed and Feed
Unlike drilling, where speeds are set at a brisk pace, reaming calls for a more measured approach, with speeds dialed back to around 70% of maximum capacity. At the same time, feeds must be increased, reaching as high as 300% or 400%, to ensure that the reamer can effectively cut through the material.
Balancing these two factors is key to achieving a successful outcome. If speeds are set too low, production levels will suffer. On the other hand, if speeds are pushed to the limit, the material being machined may become affixed to the reamer’s shafts and surfaces, hindering the cutting process.
Feed rates must also be carefully considered. If set too low, the reamer will quickly wear out, while high feed rates can result in unsightly waves and spiral marks in the final product. Finding the optimal balance between speed and feed is crucial to attaining a smooth, clean finish in reaming operations.
How to Use Them Correctly
Reamer-opening-hole-in-wood
I realize that for the uninitiated, knowing how to use these screws can be tricky. So I’ll give you a few tips.
Hand reamer
- If you are going to use a tap wrench, tighten the handle around the tapered handle of the reamer.
- Start by placing the reamer over the hole. Then move it progressively down and clockwise until it is centered in the hole.
- If you use a tap wrench, the process is the same: move the wrench clockwise until the reamer enters the hole.
- If you’re drilling steel, lubricate the tool with cutting oil.
- But if you are drilling soft iron, do not lubricate the tool.
- Put a screw on the material to be drilled. You can use this as a guide to make sure the hole is perpendicular to the jaws of the screw.
- If you will use a straight reamer, keep in mind that these have a slightly tapered tip. So it will go into the hole without any problems.
- To remove the reamer from the hole, simultaneously pull the tool and move clockwise. Never move counterclockwise, or the reamer will wear out.
- Remember to find the right speed. Going too fast or too slow will affect the reamer and leave an uneven hole.
Machine Reamer
- With a machine reamer, the feed for reaming is higher than for drilling.
- The ideal speed is usually a quarter of the speed used for drilling the same material.
- Too much feed can reduce the accuracy of the hole and the quality of the result.
- Too little feed can cause glazing or tool wear.
- The feed range varies according to the material.
How to care for them
As a bonus, here are some tips on how to properly care for your reamers.
- Before starting the reaming process, clean the reamers well. This is the only way they will work well.
- To keep them sharp, make sure you point the reamer properly. It would help if you pointed it only in the direction of the cut.
- But if you notice that the reamer has lost its sharpness, you can use a stone to sharpen its shafts.
- Fortunately, though, the blades of some reamers can be replaceable. And by some, I mean the adjustable reamers. So you might want to get one like that.
- Don’t use reamers to remove more than 0.002 or 0.003 millimeters of steel.
- After you are done using them, store them in an area where they will not contact each other or other tools. This will prevent them from being damaged while in storage.
- If you applied the ideal amount of pressure during the job, but the reamer broke, replace it with another reamer. That one probably came defective, and you will need to use another one to finish the job properly.
Hand Reamer vs. Machine Reamer Comparison Table
This comparison table provides a detailed overview of the key features and differences between hand reamers and machine reamers, helping you to make an informed decision when selecting the right tool for your needs.
| Feature | Hand Reamer | Machine Reamer |
|---|---|---|
| Wrench | Use a tap wrench, tighten the handle around the tapered handle of the reamer. Move the wrench clockwise until the reamer enters the hole. | Not required |
| Drilling material | If drilling steel, lubricate the tool with cutting oil. If drilling soft iron, do not lubricate the tool. | Varies according to material |
| Guide | Put a screw on the material to be drilled as a guide. | Not required |
| Reamer tip | If using a straight reamer, it has a slightly tapered tip. | Not applicable |
| Removing reamer | Simultaneously pull the tool and move clockwise. Never move counterclockwise. | Not applicable |
| Speed | Find the right speed. Going too fast or too slow will affect the reamer and leave an uneven hole. | Ideal speed is usually a quarter of the speed used for drilling the same material. Too much feed can reduce the accuracy of the hole, and too little feed can cause glazing or tool wear. |
It’s important to note that while hand reamers offer greater versatility and are useful for smaller, more intricate jobs, machine reamers are better suited for larger, more complex drilling tasks where speed and efficiency are key. Both types of reamers have their own unique benefits and limitations, and choosing the right one will depend on the specific requirements of each